
Browned Butter
And the tastiest chocolate chip cookies

Butter!
Butter is glorious, and adds richness and flavour to anything it’s added to. It’s made up of butter fat, water, and milk solids. Depending on which brand of butter you buy, the amounts of each will vary. For example, most commercial butters will have about 80% fat, 15% water, and 5% milk solids (i.e., proteins.) European and other high-quality butters will often have 82-85% butter fat and less water, which is why they’re often used in pastries where a richer flavour or flakiness is desired.
Browning
There are a few principles in cooking and baking that elevate the flavour profile of the finished product, and browning is one of them. What is “browning” exactly? Well, it’s sometimes referred to as the Maillard reaction, which is the process by which proteins and carbohydrates, when direct heat is applied, start to turn brown and develop a toasty, nutty flavour. It’s the same process that you use to brown meat, chicken, or vegetables, and the one that makes baked goods (bread, cookies) turn brown.
If you think about boiled meat or vegetables (yuck) you don’t get much flavour from them as the Maillard reaction can’t happen in the presence of water. But if you fry, sear, or roast them, all of a sudden they become much more flavourful. It’s also the reason why we brown meat before adding liquid to make a pasta sauce, soup, or stew. That’s the impact of browning and the Maillard reaction, which can be used to enhance the flavour of butter.
Uses for browned butter
Anywhere you use butter for flavour, you can use browned butter. Since most of the water has evaporated from the butter as it browns, you may have to replace some of that moisture/liquid in your recipe (hence why I added the ice cube in the video below) so it won’t always replace regular butter 1:1 in a recipe. Also, since the butter is melted, it’s best used in recipes where hard/solid butter isn’t required (e.g., pastry, though you could make certain kinds of shortbread-type crusts with liquified brown butter.)
In savoury applications, it can be added to a filling (e.g., squash-filled ravioli) or turned into a sauce by making a roux, then adding liquid (wine, broth, milk) or even just tossed as-is on some fresh pasta.
I’ve been using browned butter in my cookie recipes for a while, since it imparts a rich, nutty, butterscotch-like flavour to whatever I’m making. It could also be used in a cake, quick bread, or frosting to give it a deeper, richer flavour.
How to brown the butter
This short video shows how to brown the butter, and the extra step of adding the ice cube at the end (for the cookie recipe.)
Steps
Choose a pot that’s larger than you think you’ll need as the butter will bubble up as it’s browning.
Cut the butter into small cubes so that it melts evenly—you don’t want some of the milk solids to start browning before the entire block of butter has melted.
Turn the heat on medium to start. Once all the butter has melted and it begins to bubble, turn the heat down to med-low.
Don’t take your eyes off the pot as it can bubble over very quickly.
Once the milk solids (white bits) have sunk to the bottom, they will begin to toast and turn brown in the hot butterfat.
Turn off the heat and begin to cool down your butter before it gets too dark. For the cookie recipe, it calls for whisking in an ice cube. You can also transfer the butter to another bowl and whisk it over an ice bath to cool it down.
Depending on what you’ll be using the browned butter for, you can refrigerate it so that it turns solid, or you can leave it at room temperature to set (but it won’t get rock hard.)
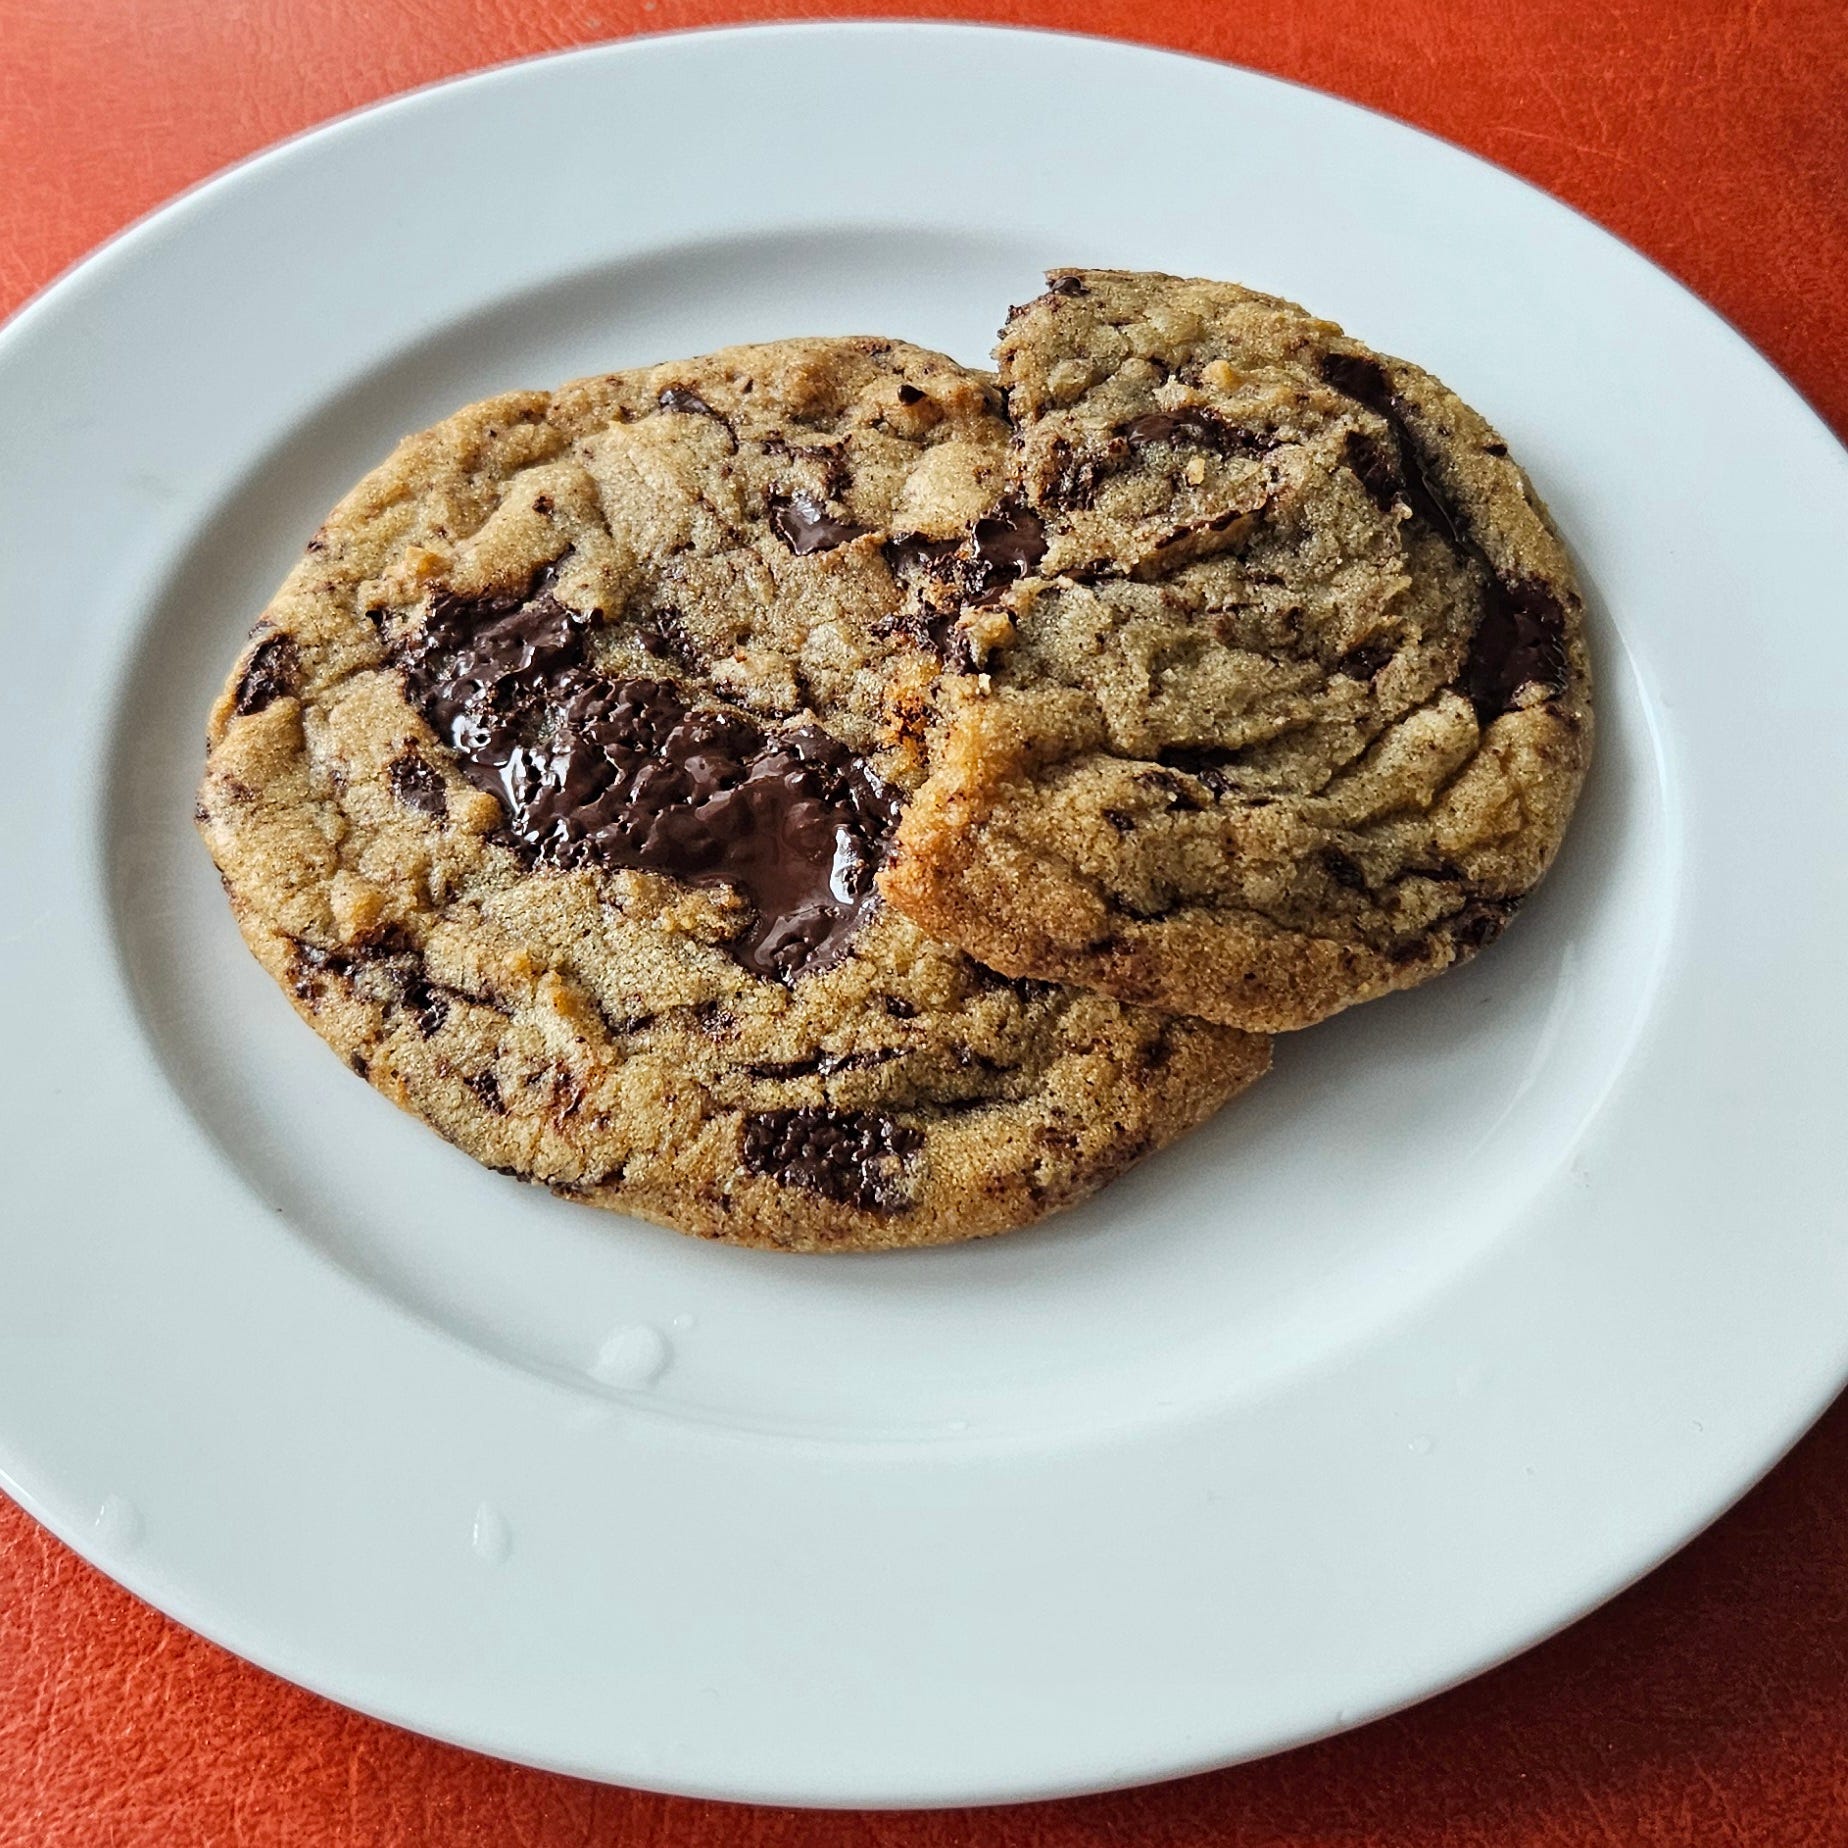
Brown Butter Chocolate Chip Cookies
This recipe is from Serious Eats, one of my go-to sources for recipes as they are rigorously tested, and they explain the science behind ingredients and methods to achieve the desired results. If you want to know the scientific explanation as to why ingredients are combined the way they are, why baking soda is used, why this recipe calls for two types of sugars, and why you should let your cookie dough rest in the fridge overnight*, I suggest you read this post. I do talk about some of it in the video.
*I mention this at the end of the video below, but I’ll mention it right up front as a warning: this recipe is meant to be made a day (or up to three days) ahead of when you’re going to bake the cookies. You absolutely can bake them the same day, but for the best, deepest, most complex flavour, it’s best to rest the dough overnight. If you don’t have the patience for that (or didn’t plan ahead,) simply chilling the dough for a couple of hours (or maybe just for the amount of time to clean up and for the oven to preheat) will still yield some benefits.
The Recipe
225g (1/2 pound) unsalted butter, browned and cooled (see video above)
140g white sugar
2 eggs at room temperature
2 tsp vanilla extract
140g dark brown sugar
280g All-purpose Flour
2 tsp Kosher salt
3/4 tsp baking soda
225g chopped chocolate (or chocolate chips)**
You’ll want to start the brown butter first, a few hours beforehand, as it will need time to cool and set up (take your eggs out of the fridge around the same time so they can warm up to room temp.) As you’ll see in the video below, you want it to resemble spreadable peanut butter once it has cooled.
Weigh out all your ingredients above into separate bowls, adding the salt and baking soda to your bowl of flour.
With the whisk attachment on your stand mixer, beat the eggs with the white sugar and vanilla extract at high speed for about 5 minutes until pale yellow and ribbony, and the sugar is mostly dissolved (you won’t feel any grittiness when you rub it between your finger and thumb.)
Switch to the paddle attachment, add the brown sugar and brown butter to the bowl, then beat again for 3-4 minutes until light and fluffy.
Add half the flour and mix slowly to incorporate for about 30 seconds, add the chocolate, mix again, then add the remaining flour. Total mixing time will only be about 60 seconds, until the flour is just barely incorporated.
**I actually found that 225g of chopped chocolate was a lot, so I might use less next time I make them.
Cover with plastic wrap right on the surface of the dough and place the bowl in the fridge overnight (or up to 3 days, if you can stand it.)
When ready to bake, take the dough out of the fridge to warm it up, making it easier to scoop. Preheat your oven to 325F. Line a baking sheet with parchment paper or a silicone mat.
Use a 1 oz or 1.25-oz cookie scoop (that’s what I used) or two spoons to scoop out balls of dough. Place them on the cookie sheet, giving enough room for them to spread. My 1.25 oz cookie scoop yielded 20 cookies.
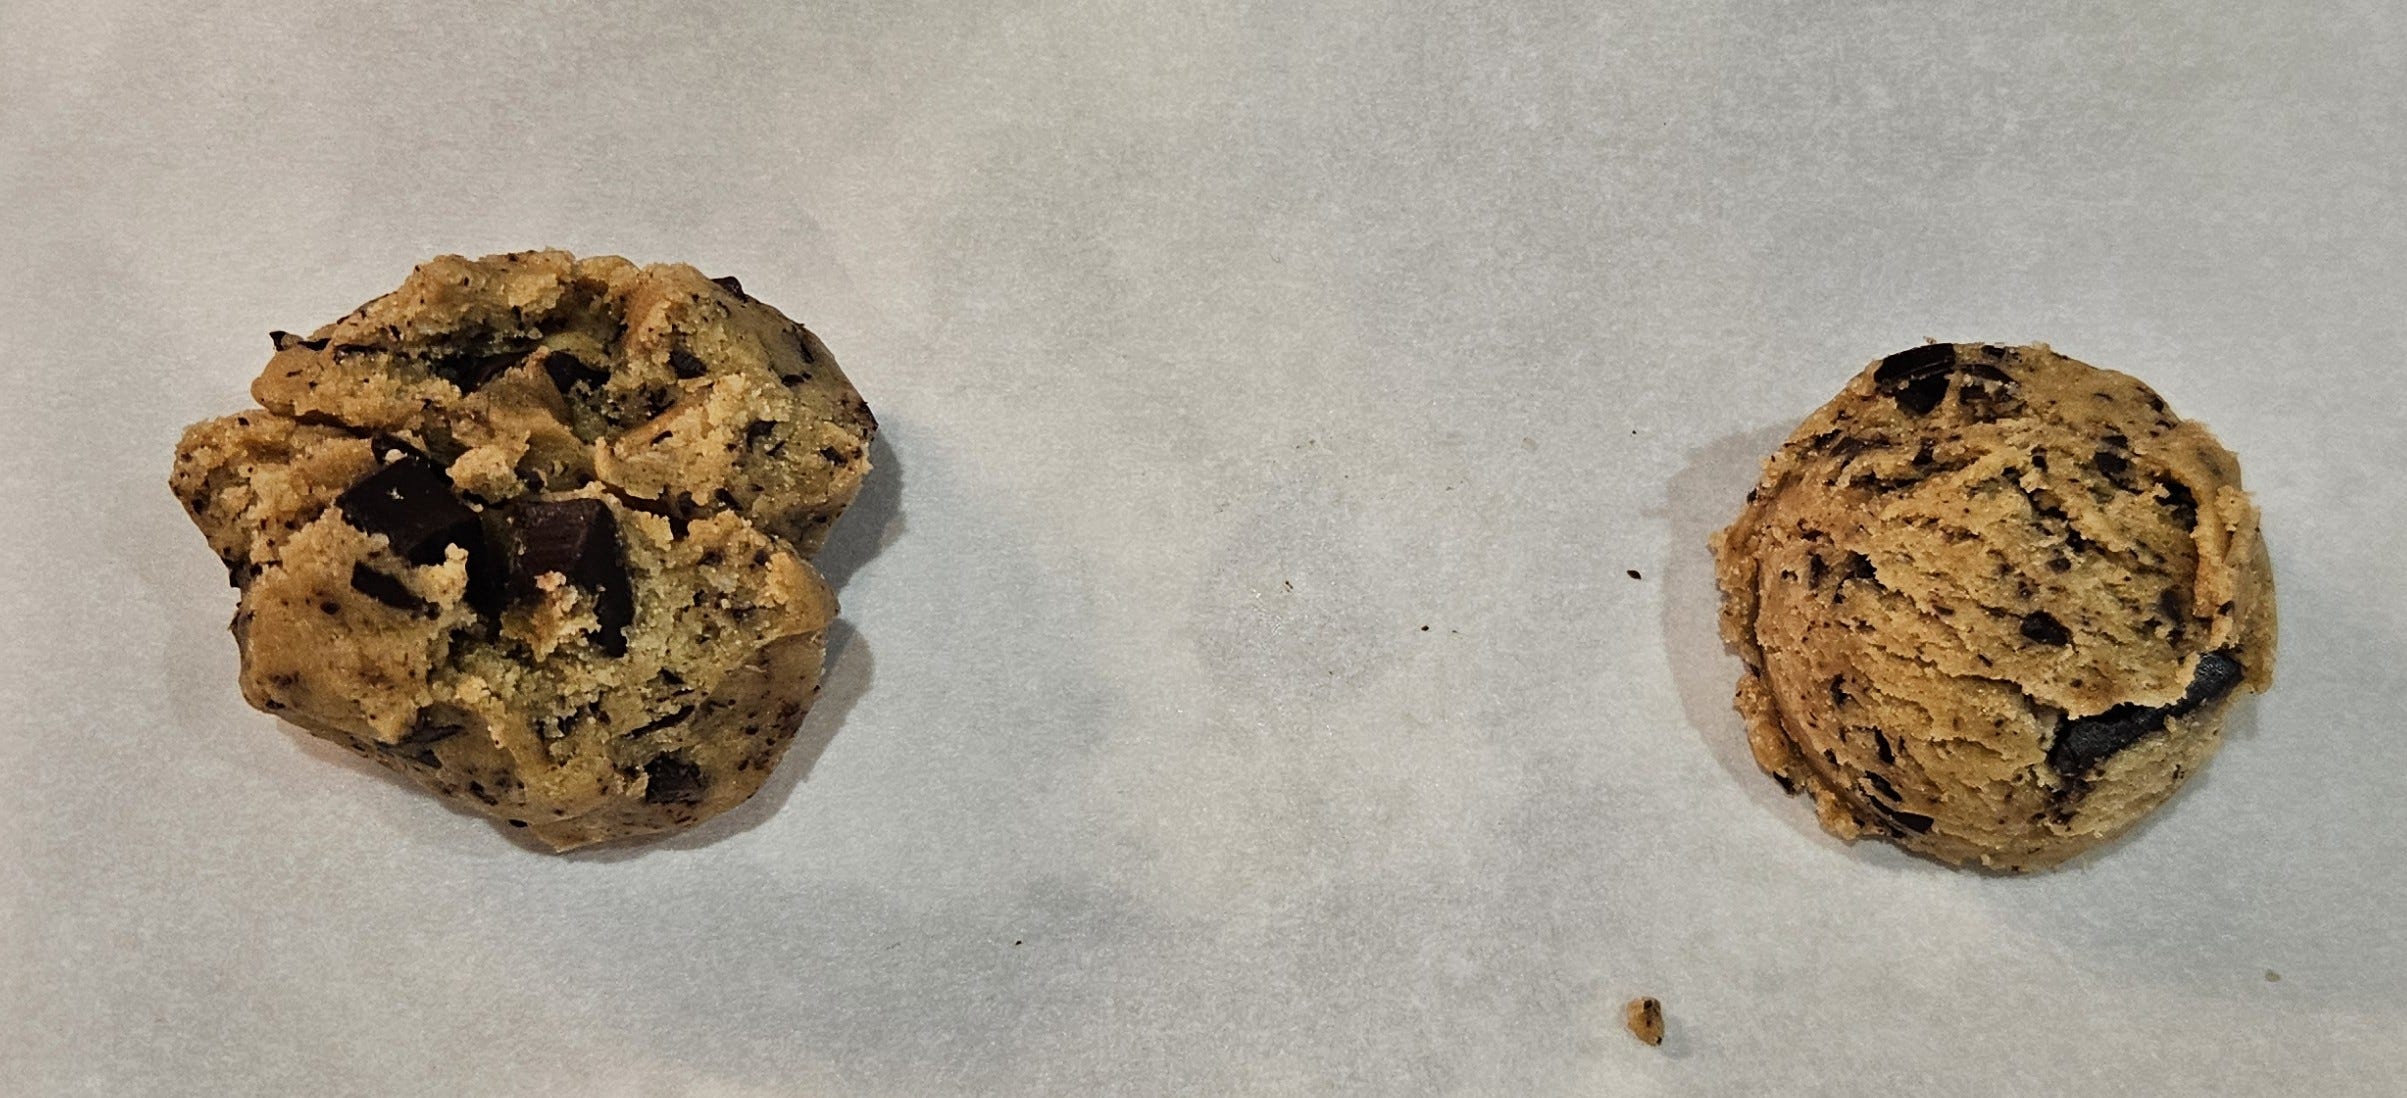
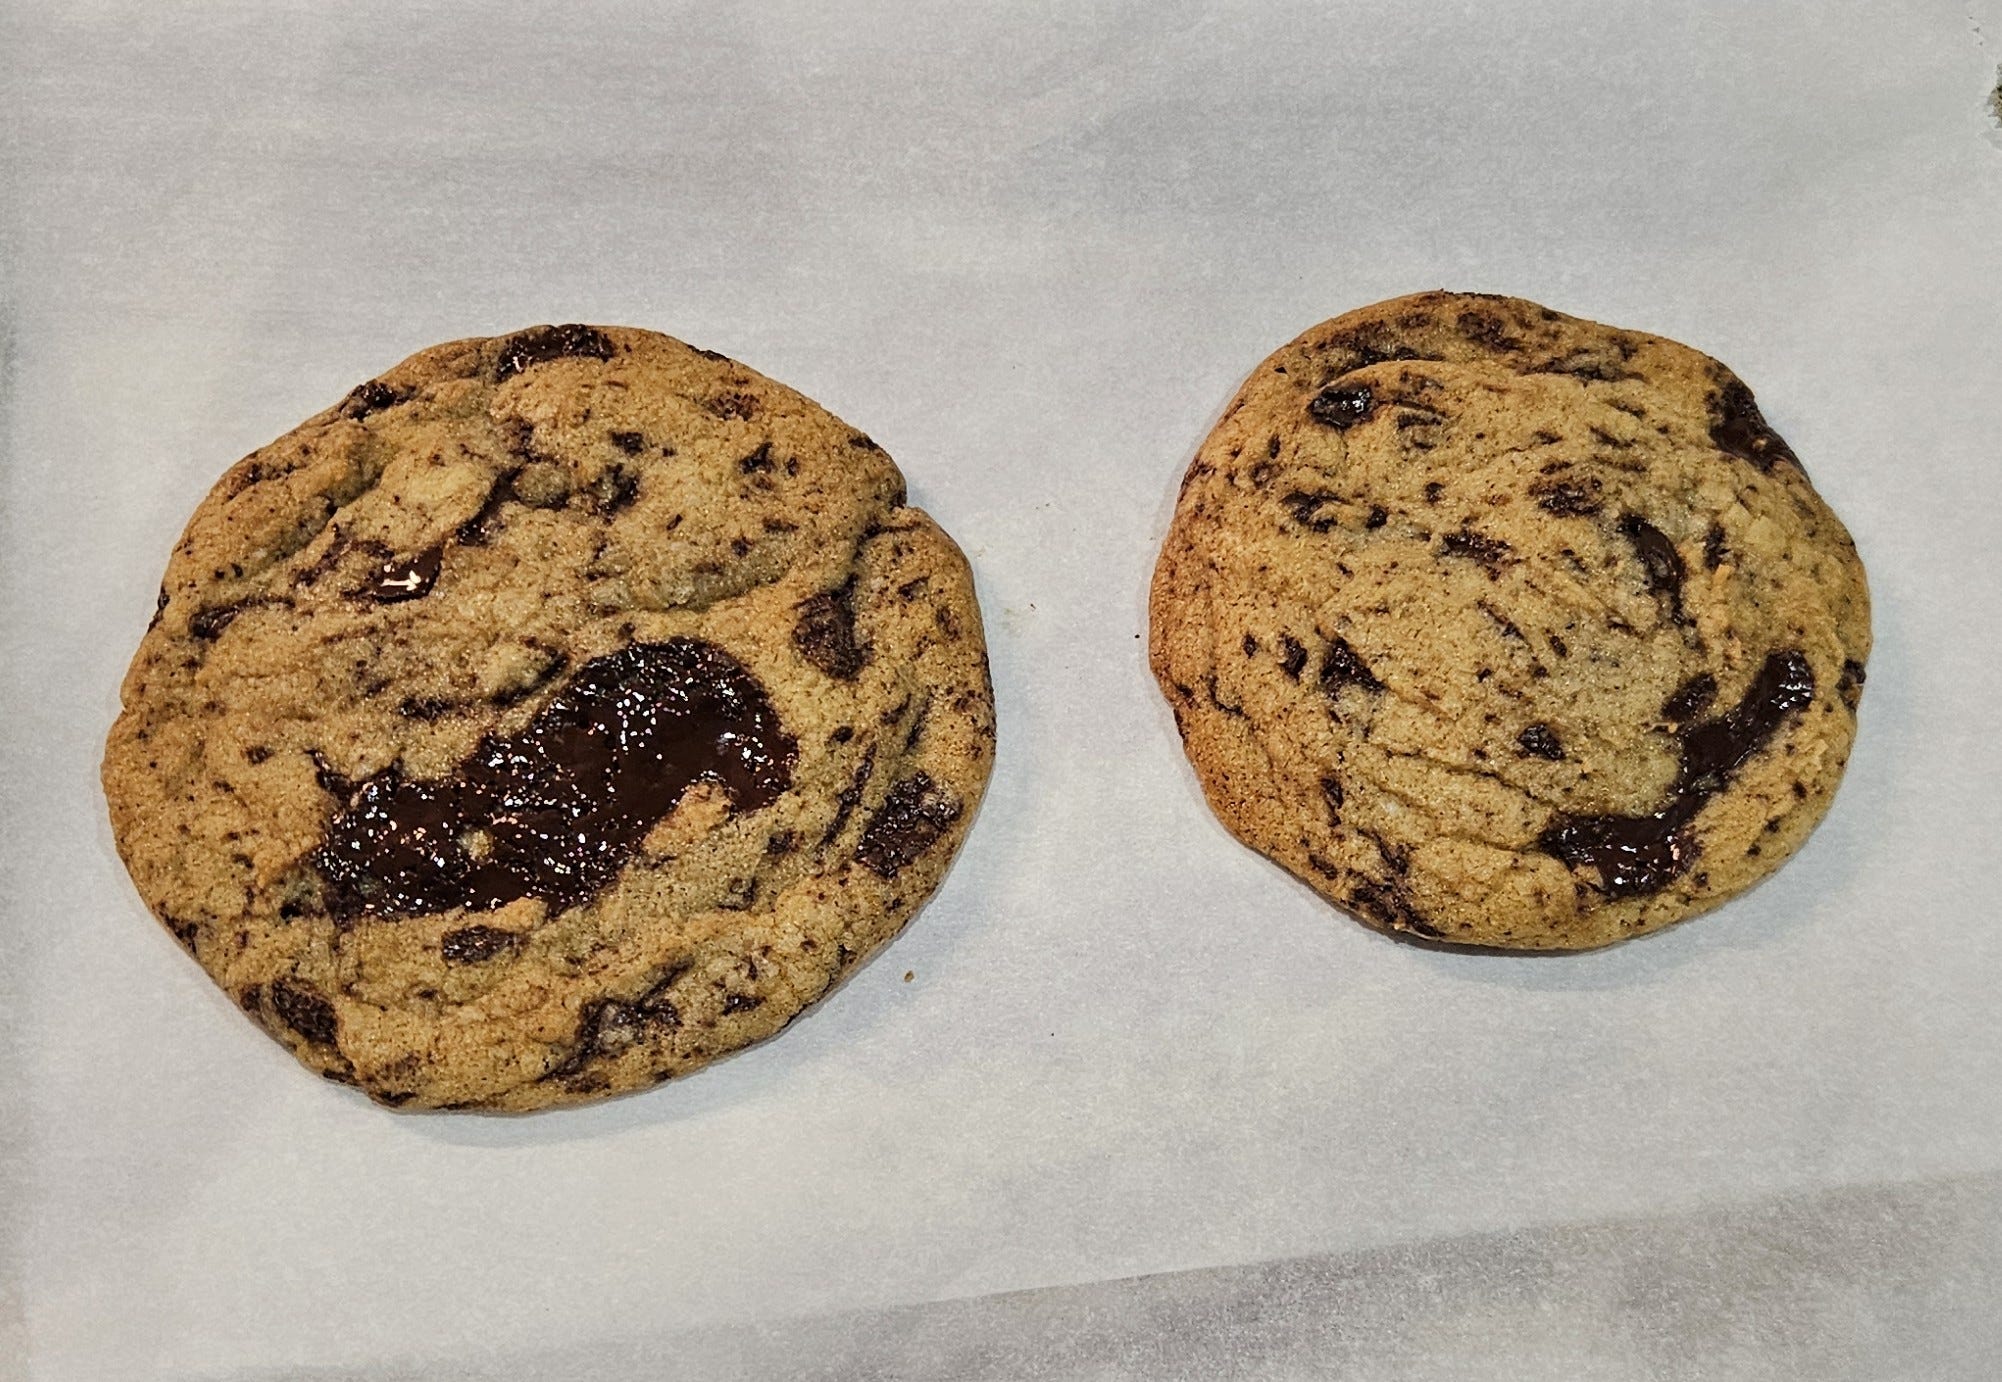
The original recipe says to break each ball in half then put them back together with the rough edges facing outward to create a rougher finished surface, but I haven’t noticed that creating much of a difference.

On the left, I broke the ball in half and smooshed it back together with the broken part exposed. On the right, I left it how it came out of the scoop (notice it isn’t smooth, but has some roughness to it.)

After baking, the one I’d broken in half and put back together spread out quite a bit more than the one I left intact out of the scoop.
Bake in the middle or upper middle of the oven for 13-17 minutes, depending on how well done you like your cookies. Let them cool on the sheet for 3-4 minutes, then move them to a wire rack to finish cooling.
Store cookies in an air-tight container at room temperature.
Freezing Cookies / Dough
Once baked, you can freeze the cookies in an air-tight container for a couple of months (if they last that long.) Take them out as you wish and let them thaw at room temperature for an hour or so.
Personally, I prefer freezing the dough itself once I’ve portioned it out into balls. That way, I can take one or two cookies out of the freezer at a time, and I’ll have a freshly-baked cookie whenever I want one. It also prevents me from eating more cookies than I should, were I to bake the entire batch at once.
After the balls are frozen, put them in a zippered freezer bag. They will keep for several months.
You can bake the balls of dough from frozen, but they won’t spread out as much and they might take a bit longer to bake. It might be worth experimenting to see which method you prefer.
Bonus: Oatmeal Raisin Cookies
This same recipe can be adapted to make Oatmeal Raisin (or Oatmeal Chocolate Chip, if you prefer.) The method and ingredients are the same, the only change is to the amount of flour, and the addition of rolled oats (use large flake oats, not the instant or quick-cooking kind) and raisins:
215g AP flour
215g Large flake rolled oats
225g Raisins (or chocolate chips)
1 tsp cinnamon (optional)
1 tsp nutmeg (optional)
Summary
Butter and browning are two of the most flavourful elements in cooking and baking. So when we brown our butter, we’re taking it to the next level! Cookies can be very divisive (chunks vs. chips, raisins vs. chocolate,) but I don’t think that anyone would turn down one of these brown butter chocolate chunk cookies! Which do you prefer?